Elevation : 8222 feet (2506 meters) Prominence: 5843 feet (1781 meters) Location : 50:30.4 N, 122:37.2 W (Dec Deg. 50.51117, 122.62098) Backroads Mapbook: Vancouver, Coast BC & Mountains (3rd edition), Map 36 (Birkenhead Lake), E4
There might be an updated mapbook that covers this area in greater detail. Climb Duration: Birkenhead Peak can be climbed within a single long day;
most summiters might need to allow 10 hours roundtrip for the climb.
However, the long drive to reach the mountain from major urban areas typically
requires a minimum 2-3 day trip, overall. Elevation gain (Cumulative): approximately 3500 feet (1070 meters) Hiking/Mountaineering Distance (Round-trip): approximately 9.0 miles (14.5 km) Difficulty: Some Class 3, some snow, many route sections with exposure, do not attempt when wet. Others in Party: John Stolk Date Climbed: September 7, 2013
Overview
In this region, the name “Birkenhead” is probably most commonly associated with the
lake and provincial park of that name rather than the peak. However, Birkenhead Peak
is a quality mountain, both in regards to stature and destination. With a clean prominence
of 5843 feet (1781 meters), the peak stands high above its immediate surroundings
as if an island within a mountainous range. Some maps show a “Birkenhead Peak Trail”
but the reality is that the “trail” is more like a narrow goat path in many sections;
getting lost or slipping is not an option in many sections of the route,
especially during the approach's first half. The mountain is seldom climbed, possibly only
summited by an average of 1-2 climbing parties annually.
John and I left our homes near Puget Sound on a Friday night, eventually finding a suitable
camping location alongside the Sea-To-Sky Highway late that evening. We woke up early the
next morning and drove to the small saddle near the last set of microwave towers.
The final approach road to the “trailhead” climbs an astonishing 5250+ feet (1600+ meters)
in only 6.6 miles (10.6 km); John’s high clearance 4WD was definitely helpful.
As is the case with many high elevation Canadian mountains, we found September a good month
to visit Birkenhead Peak due to a late summer weather window, no bugs, and limited snow
along the approach. Most potential summiters attempt the peak during dry days in August,
September or possibly early October if a late season weather window allows doing so.
Some climbing parties attempt the peak earlier in the summer, and occasionally spring,
but high elevation snow and ice can cause major route complications and possibly even make
some route options inaccessible. The standard approach should only be attempted during
dry periods due to steep sidehilling, steep traverses along loose rocks, plus traverses
and scrambling along steep rocky sections covered by lichen and other plant growth
which become dangerously slippery when wet.
The summit is worth the effort, with vast views in every direction. The summit hill
also has a tall tower enclosure and a wooden landing platform. The tower can be seen
from many areas of the upper route, and perhaps can be used by potential summiters
as a beacon of hope/despair for how close/far the summit still is during an attempt.
I created a
detailed SummitPost page
for this peak. Other trip reports and information for Birkenhead Peak might be found
on the ClubTread forum website.
Driving Instructions (starting from Pemberton, BC)
1) Drive east along Highway 99 ("Sea-To-Sky Highway").
2) After approximately 7.0 km (4.5 miles), continue straight/left onto Main Street/Pemberton Portage Road,
towards D'Arcy and Birkenhead Lake Provincial Park.
3) After approximately 34 km (21 miles), turn left onto Blackwater Creek Road, towards Birkenhead Lake.
4) Within 1.0 km, a steep gravel road appears on the left side of the main road.
This is the access road for Birkenhead Peak. A sign at the road entrance says it is the
King D'Arcy/Microwave Forest Service Road. Elevation is approximately 300 Meters (984').
IMPORTANT: This access road is a single lane dirt and gravel road, very steep in places.
The road climbs 1600 meters (5250 feet) of elevation gain in only 10.5 km (6.6 miles)!
Although the road condition is mostly decent, only high clearance
4WD or AWD vehicles should be driven on this access road.
5) After approximately 1.9 km (1.2 miles), the road splits. Veer right onto the road continuing uphill.
6) After approximately 0.6 km (0.4 miles) from the previous junction, the road splits again.
This time, take the straight/left road which temporarily goes downhill.
7) After approximately 8.0 km (5.0 miles) from the previous junction, and shortly after
passing by microwave towers #1 and #2, reach a large road bend leading microwave tower #3.
There is enough space at the road bend for parking. An old dirt and gravel jeep road heads
steeply uphill (to the west) from the road bend; this old road is the trailhead.
Elevation is approximately 1900 meters (6240 feet).
Standard Hiking / Climbing Approach
I have divided the standard Birkenhead Peak route into five distinct sections.
SECTION 1: Good Road, Good Trail
1) Follow the old dirt and gravel jeep road until it soon reaches a dead-end at a flat rocky landing.
2) A well-defined trail can be seen continuing beyond the landing. Follow the trail, which generally
goes in a westward direction as it rounds corners and ascends small hills.
John walks along trail.
3) The trail tends to disappear atop a small meadow hill which has a great view
of the southeast side of Microwave Ridge's southeast side.
view of Microwave Ridge from initial trail.
4) Descend the small hill until reaching a generally flat area at the base of a small boulder slope.
SECTION 2: Goat Trail Traverse
5) Hike through the small meadow/rocky area towards a large block of rocks located on the southwest (left)
corner of the area.
6) From near the large block of rocks, look ahead (and above) at the slope in the distance.
If you focus well enough (assuming good visibility), you should be able to locate an outline
of a path along the slope. Mentally trace the general path direction back to where it appears
it might reach your location. Walk towards that path as best as possible.
Beginning of “Goat trail Traverse” section.
Some parts of the path can be seen in this photo,
especially upper-left of center heading towards and across a dirt slope.
7) Once the trail is found, it is a well-defined path which side-traverses sloped meadows and small forest groves.
This marks the beginning of what I denote the "Goat Trail Traverse".
8) The path goes uphill until reaching the top of a forest/rock rib. Beyond this location is where the
"Goat Trail Traverse" has gained a notorious reputation.
Looking back at first part of route
from the first forest/rock rib. Microwave Tower #3 can be seen in the upper-right of the photo,
partially behind a large rocky hill.
9) The "Goat Trail Traverse" then crosses at least a half dozen steep dirt and scree gullies and slopes,
many times with cliffs below. Sometimes apparent footings are smaller than boot sizes, and sometimes seemingly
stable terrain is not. Some of these gully traverse sections are nothing more walks but it might be necessary
to hold onto small rocks or trees for stability and access; it might even be necessary to dig out new handholds
and footholds if no safer options are seemingly available. The key to these gullies is to watch each step
and take time analyzing the terrain. Surefootedness is essential and many people have turned around
during this section of the route, as a slip could definitely be fatal in many of these gully side-traverses.
John crosses one of the steep dirt/scree gullies
of the “Goat Trail Traverse”.
Craig crosses one of the steep dirt/scree slopes
of the “Goat Trail Traverse”. Photo courtesy of John Stolk.
10) The "Goat Trail Traverse" ends at a small flat area below a very steep rock and tree slope.
The path seems to continue around a corner of the ridge but soon fades out.
SECTION 3: Microwave Ridge
11) From the small flat area, look at the steep cliff immediately north. A steep dirt gully is seen angling up the right side.
12) Steeply ascend the dirt gully. It is not as steep or exposed as it first appears from below.
However, a slip in the gully could cause serious injury. The dirt is firmer on the sides than in the middle,
and it certainly can assist a climber to use small tree branches and/or rocks for stability.
However, many of the rocks in this area that seem stable might actually be loose or can easily break.
Monitor your surroundings and use caution.
SIDE-NOTE: It might be possible to steeply scramble up another part of the cliff other than the
steep dirt gully mentioned in the previous description. However, the rock stability might be questionable
and there are many tight evergreen trees obstructing access.
John ascends the steep dirt gully.
13) Once atop the steep dirt gully, continue ascending (possibly scrambling) scree slopes northward
up the ridgeline. It is very important to make certain of where the top of the gully is,
as many mountaineers have difficulty finding it during descents. Consider a marker or GPS waypoint.
The summit of Birkenhead Peak can be seen from behind the distant ridgeline.
First view of Birkenhead summit, peeking from behind its east ridge.
14) The steep ridge soon intersects another ridge, one which leads north towards the summit of Microwave Ridge.
It is very important to make certain of where this ridge intersection is, as many mountaineers have difficulty
finding it during descents. Consider a marker or GPS waypoint.
John ascends north up Microwave Ridge.
15) Either ascend via sidehilling along loose scree on the upper west slopes of the peak,
or follow more stable (but steeper) rocky ground along the top of the ridgeline.
John ascends a steep rocky slope of Microwave Ridge.
16) Either traverse over or pass by the summit contenders of Microwave Ridge (2314+ Meters / 7592'+), continuing north.
Birkenhead Peak, as seen from atop Microwave Ridge.
Craig hikes across Microwave Ridge. Photo courtesy of John Stolk.
17) Drop down loose scree slopes on the northwest side of Microwave Ridge towards a small saddle (2120 meters / 6955 feet).
18) From the saddle, begin side-traversing rocky slopes and slightly uphill to small rocky saddle on the ridge
extending north-northeast from Birkenhead Peak.
The west side of Microwave Ridge, as seen from north of Birkenhead Peak.
SECTION 4: North Ridge Of Birkenhead Peak
19) Hike south along the bouldery ridgetop, towards Birkenhead Peak.
The bouldery north ridge of Birkenhead Peak.
20) As the ridgetop becomes steeper and more cliffy, begin side-traversing along the west slope (rocks, dirt, heather).
21) As the west slope gradually heads toward cliffs and gendarmes,
begin to steeply ascend to the ridgetop. Some minor scrambling might be necessary.
22) Once on the ridgetop, continue following it until reaching a cliff face
which appears to impede progress. It might be possible to scramble or rock climb up the cliff face,
but it is recommended to follow a narrow ledge around the west (right) side of the cliff face to a
series of slanted ledges and large boulders.
John tries to determine the best route up or around the cliff face.
23) It might be possible to scramble far downhill and around a gendarme before ascending back to the ridgetop,
but most mountaineers likely choose the quicker option to scramble directly up ledges and boulders to the ridgetop.
However, this section can be dangerously slippery if wet, due to lichen and plant growth on the rocks and ledges,
and there is definite exposure.
24) Continue following the ridgetop until reaching the base of a boulder slope.
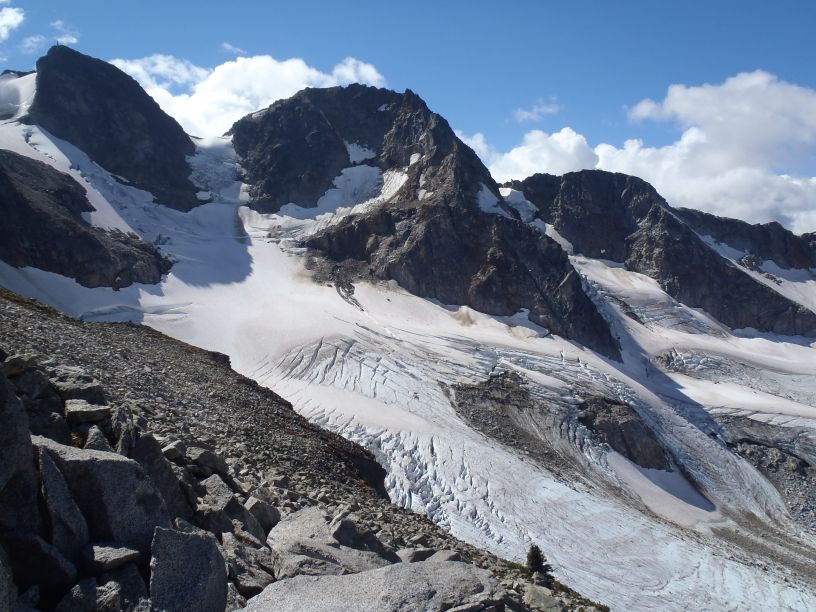
The summit is clearly in view to the south-southwest.
Summit of Birkenhead Peak at upper left.
Birken Glacier is at center.
25) Hike and scramble up the slope, and then stay on or westside of the ridgetop until reaching a broad rocky plateau.
Broad plateau at southern end of north ridge.SECTION 5: False Summit Scramble To True Summit
26) Cross the broad plateau until reaching the point where the ridge turns
west (right) towards the false summit of Birkenhead Peak.
27) Hike and then scramble (sometimes exposed) up or alongside several buttresses.
The steep top slopes of the Birken Glacier butts against the north side of the buttresses.
Many of the rocks on the buttresses and surrounding slopes are loose; some rocks and boulders look stable
which might not be. Watch every handhold and foothold while scrambling.
False summit on left, true summit in background on right. Photo courtesy of John Stolk.
John begins ascending combination of snow and rock of false summit.
28) Once atop the false summit, drop down the right side onto some ledges.
John looks for optimum location to drop down from false summit.
29) Cross a slanted slope alongside a cliff face to the final saddle before the true summit.
30) Ascend to the true summit, marked by a large rock cairn. Beyond the true summit
is an artificial conical tower with a wooden helicopter landing platform nearby.
John reaches Birkenhead summit. Tower can be seen in the background.
Tower and helicopter landing platform.Craig takes a break on helicopter landing platform. Photo courtesy of John Stolk.
John stands in front of tower.IMPORTANT: During late Summer and early Autumn, the general level of difficulty does not exceed
YDS Class 3. However, there are multiple areas of the standard approach where a fall could result
in serious injury or a fatality. The most notable areas of caution are the "Goat Trail Traverse",
the steep dirt gully, and several exposed locations along the north ridge and false summit ridge.
This is not a peak recommended for amateur mountaineers or hikers.
Several route variations are available which could include rock climbing, glacier travel,
and/or other forms of roped mountaineering.